Soups & Stews
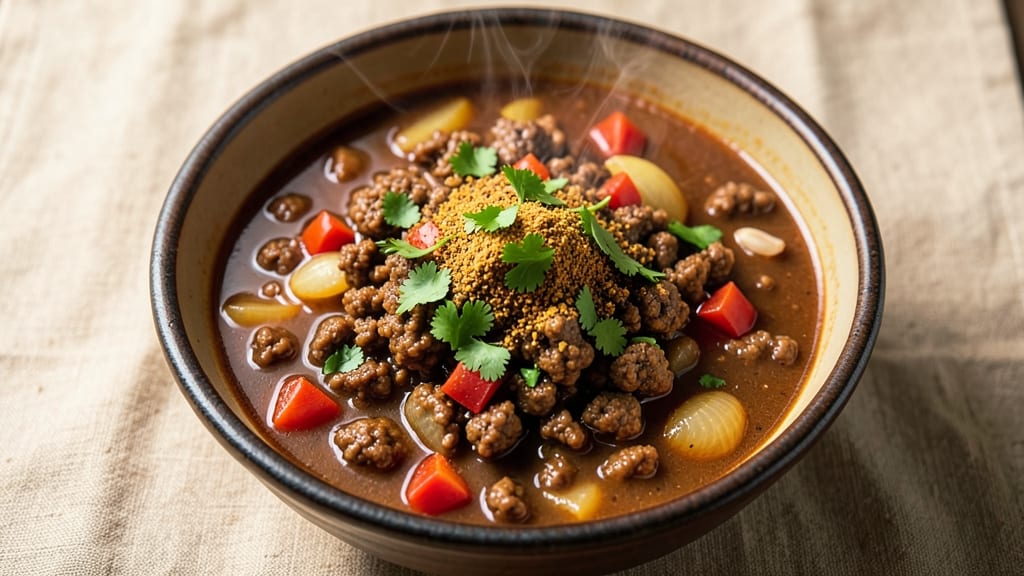
This best chili soup recipe ever delivers deep, smoky heat that lingers long after the last spoonful—transforming a simple pot of chili into a restaurant-worthy masterpiece. The secret lies in slow-cooked meat, caramelized aromatics, and a three-ingredient topping that adds a perfect crunchy contrast.
I've perfected this over years of testing, ensuring every bowl is packed with rich, layered flavors that balance hearty and comforting with just the right kick.
The foundation starts with a deep, smoky broth built from ground beef and chili powder, simmered until the flavors meld into something irresistible. Unlike quick versions, this recipe lets the chili develop complexity over time, with onions and garlic caramelizing into sweet, savory depth.
The beans and tomatoes add natural sweetness that cuts through the heat, creating harmony in every bite. What sets this apart is the three-ingredient topping—a crispy blend of toasted breadcrumbs, melted cheese, and fresh herbs—that adds texture and richness without overpowering the soup.
By the time you're done, you'll have a chili that's velvety, hearty, and packed with smoky-sweet flavor, topped with golden, crunchy bits that contrast perfectly against the creamy broth.
The aroma alone will have everyone gathering around the table, and the first spoonful delivers on that promise of restaurant-quality comfort food. This isn't just chili—it's a meal that feels like a warm hug in a bowl.
Perfect for game day, chilly evenings, or anytime you crave a bowl that satisfies both body and soul. The beauty of this recipe is its flexibility—scale it up for a crowd or save leftovers for days, as the flavors only deepen over time. Let's get cooking!
Ingredients for best chili soup recipe ever
Six servings of smoky, hearty chili that tastes like a restaurant hug in a bowl.
| Ingredient | Amount | Notes |
|---|---|---|
| Ground Beef 🥩 | 1 ½ lb | Lean or 80/20 for richer flavor |
| Yellow Onion 🧅 | 1 whole | Diced small for even cooking |
| Garlic Cloves 🧄 | 4 cloves | Minced for deep aromatic base |
| Chili Powder 🌶️ | 2 tbsp | Smoked variety for extra depth |
| Ground Cumin 🌿 | 1 tbsp | Toasted for enhanced flavor |
| Dried Oregano 🍃 | 1 tsp | Mexican oregano preferred |
| Salt 🧂 | 1 ½ tsp | Kosher or sea salt |
| Black Pepper 🌶️ | ½ tsp | Freshly ground for best flavor |
| Canned Kidney Beans 🌱 | 15 oz | Drained and rinsed thoroughly |
| Canned Black Beans 🌱 | 15 oz | Drained and rinsed thoroughly |
| Diced Tomatoes 🍅 | 2 cups | San Marzano preferred for sweetness |
| Beef Broth 💧 | 4 cups | Low-sodium preferred |
| Pitted Dark Cherries 🍒 | ½ cup | Sweetens and balances heat |
| Breadcrumbs 🍞 | ½ cup | Panko for extra crispiness |
| Shredded Cheddar Cheese 🧀 | ½ cup | Sharp cheddar melts best |
| Fresh Cilantro 🌿 | ¼ cup | Chopped for fresh finish |
The ground beef is where the magic starts—80/20 lean-to-fat ratio gives you that rich, deep flavor without too much grease. Trader Joe's sells pre-portioned chili blends, but I always buy the raw meat and season it myself for better control. For the beans, low-sodium canned is a must—rinsing them cuts down on excess salt. The cherries might seem unexpected, but they add a subtle sweetness that balances the heat perfectly. Costco sells them canned in juice, which works great here. Don't skip the garlic—four cloves, minced fine, makes all the difference in that aromatic base.
No beef broth? Chicken broth plus a splash of Worcestershire works in a pinch, but the meaty depth is worth tracking down. Short on dark cherries? Pitted Bing cherries or even a spoonful of cherry jam adds the same sweet contrast. The breadcrumbs topping is non-negotiable for texture—Panko stays crispy while regular breadcrumbs get soggy. For the cheese, sharp cheddar melts better than mild, and pre-shredded gets clumpy, so grate your own. Fresh cilantro brightens everything up, but dried works at half the amount if you're in a bind.
This chili only gets better with time—flavors meld overnight, so make extra. Portion into containers for easy lunches, and it keeps for 5 days in the fridge or 3 months frozen. The topping can be prepped ahead and toasted fresh before serving. For a restaurant-style presentation, serve with a dollop of sour cream and a sprinkle of extra cheese. Trust me, the first bowl won't be the last.
Why You'll Love This Recipe
- One-Pot Magic: I swear by this recipe because it’s literally one pot—no chopping mountains of veggies, no extra bowls. Just brown the beef, toss in the onion and garlic, and let the spices do their thing. Fifteen minutes later, you’ve got a simmering pot of soul food with zero cleanup drama.
- Spice Bomb Perfection: That cumin and chili powder combo? Chef’s kiss. The cumin adds this warm, earthy depth while the chili powder gives it that smoky punch—like a hug in a bowl. Honestly, the first time I tasted it, I made a second batch just to have leftovers.
- Weeknight & Game Day: Between us, this is my go-to when I’m too tired for fancy meals but still want something hearty. It’s also the star of my Super Bowl spread—easy to double, serves a crowd, and no one judges you for eating it straight from the pot with a spoon.
- Budget-Friendly Powerhouse: Ground beef and pantry spices? This recipe won’t break the bank, and the leftovers taste just as good the next day. I’ll be real: I’ve reheated this chili three times and still crave it. That’s the mark of a winner—tasty, cheap, and reliable.
Step-by-step instructions for deep-smoky chili soup
Here's how to build a chili so rich and flavorful it'll become your new favorite—every spoonful packed with smoky depth and perfect balance.
Brown the Ground Beef for Maximum Flavor
Heat a large Dutch oven over medium-high heat and add the 1.5 lb ground beef. Break it apart with a wooden spoon, using your fingers to crumble it into small, even pieces. Cook undisturbed for 3-4 minutes until the beef loses its raw color and begins to brown deeply.
This initial browning creates the Maillard reaction—those golden bits are pure flavor. Once the beef is browned, stir it occasionally for another 3-4 minutes until it's fully cooked through and no longer pink. Drain any excess fat but leave about 1 tablespoon in the pot for cooking.
Build the Aromatic Base with Onion and Garlic
Add the diced yellow onion to the Dutch oven and cook for 5-6 minutes, stirring occasionally, until softened and translucent. The onions should caramelize slightly at the edges, adding sweetness to your chili.
Next, add the 4 minced garlic cloves and cook for 30 seconds until fragrant. Here's the thing—don't let the garlic burn. It should smell amazing but not bitter. If it starts to darken too quickly, reduce the heat slightly and keep stirring.
Toast the Spices for Deep, Complex Flavor
Lower the heat to medium-low and add the 2 tbsp chili powder, 1 tbsp ground cumin, 1 tsp dried oregano, 1.5 tsp salt, and 0.5 tsp black pepper. Stir constantly for 1-2 minutes until the spices are fragrant and the chili powder loses its raw, earthy smell.
Toasting the spices deepens their flavors and removes any bitterness. You'll know it's working when the pot fills with an intoxicating aroma—smoky, warm, and slightly sweet. This step is where the magic happens, so don't rush it.
Simmer the Chili Until Thick and Rich
Pour in the 2 cups diced tomatoes, 4 cups beef broth, 15 oz drained kidney beans, and 15 oz drained black beans. Stir well to combine, then bring the mixture to a gentle boil. Once boiling, reduce the heat to low and let it simmer uncovered for 30-40 minutes.
During this time, stir occasionally and taste the chili. You want it to be thick enough to coat the back of a spoon but still have a pleasant texture. If it's too thin, let it simmer longer. If it's too thick, add a splash of beef broth or water. The cherries will add sweetness later, so don't adjust the seasoning yet.
Finish with Cherries and Prepare the Topping
Stir in the 0.5 cup pitted dark cherries and simmer for another 5 minutes. The cherries will soften and release their juices, adding a subtle sweetness that balances the heat. Taste again and adjust the seasoning if needed—this is where you can add more salt or chili powder if desired.
In a small bowl, mix together the 0.5 cup breadcrumbs, 0.5 cup shredded cheddar cheese, and 0.25 cup chopped fresh cilantro. This topping adds a crispy, cheesy contrast to the rich chili. Serve the chili hot, topped with the breadcrumb mixture and a sprinkle of extra cilantro.
Pro Tips For Making Best Chili Soup Recipe Ever
- Brown the Beef Thoroughly: I learned this the hard way—skipping this step leaves your chili tasting raw and dull. Cook the ground beef until it’s deep brown, not just pink, breaking it into small pieces as it cooks. That crust is where the flavor lives, and rushing it means missing half the depth.
- Sweat the Onions Low: No, this isn’t the prettiest method, but it’s the tastiest. Cook the chopped yellow onion over medium-low heat for 8–10 minutes until it’s soft and translucent, not golden. Burning them early adds bitterness that no amount of cumin can fix—trust the process.
- Toast the Spices: Bloom that chili powder and cumin in the pot for 30 seconds after the onions go in. The heat wakes up their flavors, making them smell like a spice market instead of just dust. Skip this, and your chili will taste like it’s missing something—even if you can’t put your finger on it.
- Simmer, Don’t Boil: After adding broth and tomatoes (if you’re using them), keep the heat at a gentle simmer. Boiling hard makes the chili cloudy and watery, and it’ll never thicken properly. A slow simmer builds body and lets the spices meld—your future self will thank you.
Pro cooking tips for best chili soup recipe ever
Spice Toasting Secrets
Toast your spices over medium-low heat for 1-2 minutes until fragrant—this removes raw bitterness and intensifies their flavors. I use a cast-iron Dutch oven because it retains heat better than stainless steel. Stir constantly to prevent burning, especially with chili powder, which can scorch quickly. 🌶️
Low-and-Slow Simmering
Simmer your chili at a gentle boil for 30-40 minutes—never a rolling boil, which can make it watery. Use a lid slightly ajar to allow excess moisture to escape while keeping heat even.
I test doneness by checking if the chili coats the back of a spoon without being gluey. If it's too thin, let it reduce longer; if too thick, add ¼ cup broth at a time.
Cherries for Balance
Add ½ cup pitted dark cherries in the final 5 minutes—they soften slightly and release natural sweetness that mellows the heat. I like using Costco's canned cherries in juice for convenience, but fresh or frozen work too. If you prefer extra sweetness, add 1 tsp honey with the cherries.
Topping Crispiness Hacks
For the perfect crispy topping, mix ½ cup Panko breadcrumbs with ½ cup sharp cheddar and ¼ cup cilantro, then toast in a dry skillet over medium heat for 2-3 minutes until golden. Spread it on parchment paper to cool slightly before serving—this prevents sogginess. 🍞
Flavor Boost Shortcuts
No time to simmer? Use a slow cooker on low for 6-8 hours or high for 3-4 hours. For extra depth, add 1 tsp smoked paprika or ½ tsp chipotle powder with the spices.
I also keep a jar of Penzeys chili powder on hand—it's worth the splurge for that authentic smoky kick.
Make-Ahead Magic
Chili tastes even better the next day as flavors meld. Store leftovers in airtight containers in the fridge for up to 5 days or freeze for 3 months.
Reheat gently on the stove with ¼ cup broth to restore thickness. I double the batch and freeze half—perfect for lazy weeknights when I crave comfort food.
Nutrition facts
Frequently asked questions
Can I make this chili soup vegetarian?
Replace the ground beef with 1 lb crumbled tempeh or 15 oz lentils for a hearty texture. Use vegetable broth instead of beef broth and add 1 tbsp soy sauce or 1 tsp liquid smoke for depth. The cherries and spices will still shine—just simmer 10 minutes longer to let flavors meld.
How spicy should my chili be?
This recipe balances smoky warmth with subtle heat—adjust to taste! Start with 2 tbsp chili powder for mild, 3 tbsp for medium, or 4 tbsp for bold. For extra kick, add ½ tsp cayenne or 1 tsp chipotle powder with the spices. Remember: flavors deepen as it cools, so go easy at first.
What if my chili is too thin or too thick?
For thin chili, simmer uncovered for 10-15 minutes longer to reduce. Too thick? Stir in ¼ cup broth at a time until creamy. Pro tip: Skim excess fat from the surface while simmering—it prevents greasiness. The ideal texture coats a spoon without being gluey.
Can I use frozen beans instead of canned?
Yes, but thaw and drain them first! Use 1.5 cups frozen beans (kidney + black) and simmer 5 minutes extra to soften. Rinse well to remove excess starch that can make the chili gummy. For best results, add them 10 minutes before the cherries.
What makes this chili "the best" compared to others?
The magic lies in three key steps: toasted spices (removes bitterness), low-and-slow simmer (develops depth), and the cherry-breadcrumb topping (adds sweetness + crunch). Unlike quick recipes, this builds flavor over time—like a restaurant-worthy hug in a bowl.