Soups & Stews
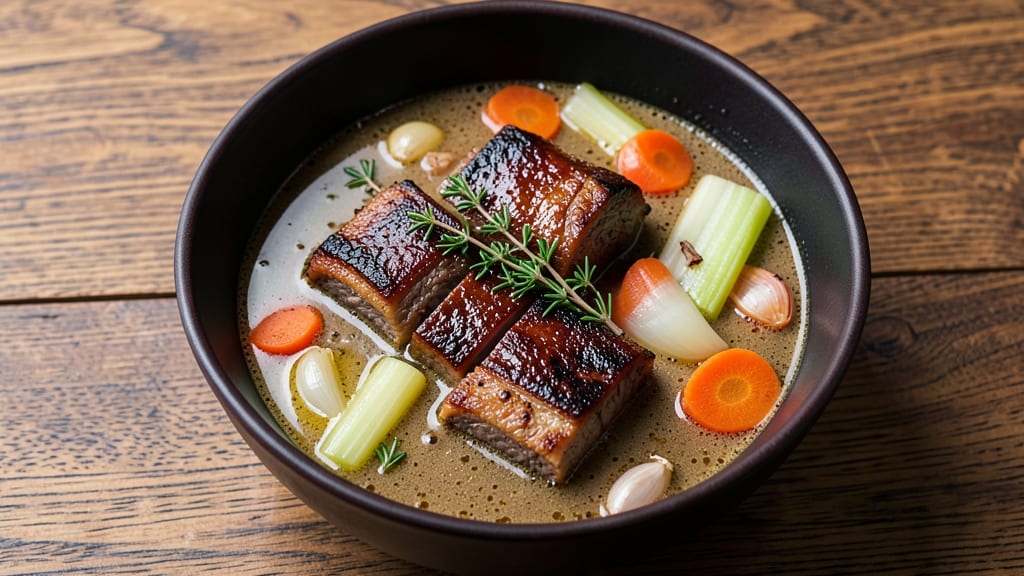
This short rib soup recipe transforms tough beef into melt-in-your-mouth perfection through slow cooking and rich aromatics. The secret lies in braising short ribs until they're fork-tender, then simmering them in a deep, caramelized broth infused with vegetables and herbs.
I developed this version after years of perfecting the balance between bold beef flavor and comforting vegetable sweetness—every spoonful delivers that restaurant-quality depth at home.
The process begins with searing the short ribs to develop a deep, meaty crust, then slow-cooking them until they practically fall apart. Aromatics like onions, carrots, and celery form the flavor base, while garlic and thyme add layers of complexity.
The result is a soup so rich and satisfying that it becomes the centerpiece of any meal, not just a side dish.
What sets this recipe apart is the way the beef's natural juices infuse the broth, creating a velvety texture that coats every bite. The vegetables soften just enough to blend seamlessly with the meat, while the herbs provide freshness that cuts through the richness.
This isn't just soup—it's a hearty, flavor-packed meal that tastes like a hug in a bowl.
The beauty of this recipe is its versatility—serve it as a main course with crusty bread or as a side for grilled meats. The leftovers, if there are any, reheat beautifully, making it perfect for meal prep.
Let's get started on creating this deeply flavorful soup that will have everyone asking for seconds.
Ingredients for short rib soup
Deep, caramelized flavors start with these quality ingredients for restaurant-worthy short rib soup.
| Ingredient | Amount | Notes |
|---|---|---|
| Beef Short Ribs 🥩 | 2 lb | Bone-in, 2-3 inches thick |
| Yellow Onions 🧅 | 2 whole | Chopped into 1/2-inch pieces |
| Carrots 🥕 | 4 whole | Peeled and cut into 1-inch chunks |
| Celery Stalks 🌿 | 4 whole | Cut into 1-inch pieces |
| Garlic Cloves 🧄 | 6 cloves | Smashed but not minced |
| Fresh Thyme 🌿 | ¼ cup | Leaves only, stems removed |
| Bay Leaves 🍃 | 2 whole | Dried, standard size |
| Tomato Paste 🍅 | 2 tbsp | Smooth, not chunky |
| Red Wine 🍷 | 1 cup | Bold dry variety like Cabernet |
| Beef Broth 💧 | 4 cups | Homemade or high-quality store-bought |
| Olive Oil 🫒 | ¼ cup | Extra-virgin for richness |
| Kosher Salt 🧂 | 1 ½ tsp | Diamond Crystal preferred |
| Ground Black Pepper 🌶️ | ½ tsp | Freshly ground for best flavor |
| All-Purpose Flour 🌾 | 2 tbsp | For dredging ribs |
The beef is non-negotiable—bone-in short ribs with good marbling deliver the richest flavor. Costco or your local butcher are best for fresh cuts; avoid pre-cut ribeye or sirloin. Look for ribs with a thick fat cap and vibrant red color. The 2-3 inch thickness ensures proper searing and slow cooking. For aromatics, Trader Joe's has pre-chopped onion-carrot-celery mixes that save time, but fresh is always better. Fresh thyme is ideal, but dried works at one-third the amount if you're in a pinch.
No red wine? Beef broth with a splash of balsamic vinegar works perfectly. The tomato paste can be swapped for 1 cup crushed tomatoes if you prefer a smoother texture. For extra depth, add 1 tsp smoked paprika to the flour dredge. The ribs should be bone-in—this adds incredible flavor to the broth. If you can't find them, substitute with chuck roast cut into 2-inch cubes, but cooking time will increase. Always use extra-virgin olive oil for searing—it adds a fruity note that regular olive oil can't match.
This soup only gets better with time—3-4 days in the fridge is ideal, allowing flavors to meld completely. Portion into containers for easy reheating. Freezes beautifully for up to 3 months—just thaw overnight in the fridge before reheating. The broth can be made ahead and stored separately, then combined with the cooked ribs when ready to serve. For extra richness, stir in 1 tbsp cold butter just before serving.
Why You'll Love This Recipe
- One-Pot Magic: I swear by this recipe because it’s all in one pot—no chopping boards full of mess. Toss in the ribs, dump in the onions, carrots, and celery (the classic "holy trinity" combo), add a few garlic cloves, and let the broth work its magic. Honestly, the only prep is rough-chopping the veggies—no dicing, no fuss.
- Deep Umami Bomb: That first sip? Chef’s kiss. The short ribs break down into melt-in-your-mouth tenderness while the onions and garlic caramelize into something rich and savory. Between us, the slow cook makes the broth so flavorful, you’ll forget how simple the ingredients are.
- Leftovers That Beg for More: This soup only gets better the next day—like a cozy hug in a bowl. I make a double batch on Sundays because it reheats beautifully, and my kids actually ask for it. (Yes, even on a Tuesday night.) Plus, the ribs keep their texture, so it’s not mushy—just perfect.
- Budget-Friendly Feast: Short ribs are cheaper than you think, and this recipe stretches them into a hearty meal for four (or two very hungry people). The veggies round it out without breaking the bank, and the flavor is so satisfying, you won’t miss overpriced takeout. My secret weapon for stretching meals? Add a splash of red wine to the broth—it elevates everything.
Step-by-step instructions for short rib soup
Here's the method for developing deep, rich flavors through slow cooking and careful layering.
Sear the Short Ribs for Maximum Flavor
Pat the 2 lb beef short ribs dry with paper towels to remove any surface moisture. This step is crucial—it creates a flavorful crust that will infuse into the soup. Heat the 0.25 cup olive oil in a large Dutch oven over medium-high heat until shimmering. Working in batches to avoid overcrowding, add the ribs and sear for 3-4 minutes per side until deeply browned. You'll know they're ready when they release easily from the pan and have developed a rich caramelization.
Remove the seared ribs and set them aside on a plate. If the oil becomes too dark, discard all but 1 tablespoon and add more olive oil if needed for the next batch. The browned bits left in the pot are called fond, and they're packed with flavor that will form the base of your soup. Don't rush this step—proper searing builds the foundation for your rich, beefy flavor profile.
Build the Aromatic Base
With the ribs removed, reduce the heat to medium and add the 2 whole chopped yellow onions, 4 whole peeled and cut carrots, and 4 whole cut celery stalks. Cook for 5-6 minutes, stirring occasionally, until the vegetables begin to soften and release their natural juices. This process, called sweating, draws out their flavors without browning them.
Add the 6 smashed garlic cloves, 0.25 cup fresh thyme leaves, and 2 whole bay leaves to the pot. Stir for 30 seconds until fragrant—you should smell the garlic's pungency and the thyme's earthy aroma. This aromatic trifecta forms the flavor backbone of your soup. Sprinkle the 2 tbsp tomato paste over the vegetables and stir to coat everything evenly. Cook for another 1 minute to toast the tomato paste slightly, which deepens its flavor.
Deglaze and Develop the Sauce
Pour in the 1 cup red wine and scrape up any browned bits from the bottom of the pot with a wooden spoon. This deglazing step captures all the caramelized flavors you worked so hard to create. Let the wine simmer for 3-4 minutes until reduced by half and slightly thickened. You'll notice the alcohol smell dissipating as it cooks off, leaving behind just the wine's rich fruitiness.
Stir in the 4 cups beef broth and bring the mixture to a gentle simmer. Return the seared ribs to the pot, along with the 1.5 tsp kosher salt and 0.5 tsp ground black pepper. The broth should come about halfway up the ribs. If it's too shallow, add a bit more water or broth. Bring everything to a gentle boil, then reduce the heat to maintain a low simmer—this is where the magic happens.
Slow Cook Until Tender
Cover the pot and let the soup simmer unattended for 2.5 to 3 hours. This long cooking time is essential—it breaks down the tough connective tissue in the ribs, transforming them into fork-tender morsels. Check occasionally and add a splash of water or broth if the liquid reduces too much. The ribs are done when they easily pull away from the bone with a fork and the meat is tender enough to shred with two forks.
About 30 minutes before the ribs are tender, skim any foam or fat that rises to the surface with a ladle. This ensures your final soup has a clean, velvety texture. The soup should have a deep, rich color and an aroma that fills your kitchen with the irresistible scent of slow-cooked beef. Taste and adjust seasoning if needed—you might need a bit more salt or pepper to balance the flavors.
Finish and Serve
Once the ribs are fork-tender, remove them from the pot and let them cool slightly. Using two forks, shred the meat directly in the pot, discarding any large bones. You should have about 2 cups of shredded beef—this is your final product. Return the shredded meat to the pot and stir to combine with the broth.
Taste the soup and make any final adjustments. For a smoother texture, you can puree about 1 cup of the soup with an immersion blender, then return it to the pot. Serve the soup immediately, garnished with fresh thyme leaves if desired. Each bowl should deliver rich, beefy flavor with tender vegetables and a velvety broth that coats your spoon. This is comfort food at its finest—deep, satisfying, and full of slow-developed flavors.
Pro Tips For Making Short Rib Soup
- SEAR THE RIBS FIRST: Walk away from the stove after that initial sear—you’re not done until they’re deep brown, almost black in spots. I used to rush this, and the soup never had that rich, meaty depth. High heat, no crowding the pan, and let them sit for 2-3 minutes per side. That crust? It’s what turns your soup from good to "I’d drive 20 minutes for this."
- CUT SHORT RIBS UNIFORM: Bone-in or not, slice them to roughly the same thickness—about 1.5 inches max. Thicker pieces stay tough; thinner ones turn to mush. Use a sharp knife and don’t overthink it—just consistent chunks. (Yes, even if it looks messy. Your future self will notice the difference.)
- SWEAT VEGETABLES LOW AND SLOW: After the ribs hit the pot, drop in onions, carrots, and celery with a splash of water or broth. Cover and let them steam for 10 minutes before adding garlic. I learned this the hard way—burnt garlic ruins everything, and you’ll taste it. Patience here means no bitter notes later.
- Skim Early, Skim Often: After the first 30 minutes of simmering, skim off the foam and fat that rises to the top with a ladle or fine-mesh strainer. I know, it’s tedious, but it keeps the broth silky and prevents a greasy finish. Do it every 15 minutes for the first hour—your broth will thank you. (And yes, save that fat for another use if you’re feeling fancy.)
Essential equipment for great short rib soup
Dutch Oven Essentials
A 6-quart Dutch oven is your best friend for this recipe—it's deep enough to hold the ribs and broth while allowing room for the meat to tenderize.
I recommend the Le Creuset Stoneware Dutch Oven for its even heat distribution and durability, but All-Clad Stainless Steel works too if you prefer a lighter option. The lid should fit tightly to trap steam and cook the ribs evenly. 🔥
Immersion Blender
For a silky-smooth texture, an immersion blender is a game-changer. I use the Ninja BN601—it’s powerful enough to puree the broth without making a mess. If you don’t have one, a regular blender works, but you’ll need to cool the soup first and handle hot liquid carefully.
A quick 30-second blend of 1 cup of broth creates a velvety base that elevates the entire dish.
Meat Thermometer
A meat thermometer ensures your ribs reach the perfect 195-203°F internal temperature for fork-tender results. The ThermoWorks Smoke is my go-to—it’s precise, wireless, and stays accurate through long cooks.
Insert the probe into the thickest part of the meat to avoid hitting bones. When the thermometer reads 195°F, the ribs are ready to shred.
Wooden Spoon
A long wooden spoon is non-negotiable for stirring and deglazing. I prefer Oxo Good Grips—the angled handle keeps your knuckles safe from the pot’s edge, and the sturdy wood won’t warp under high heat.
Avoid metal utensils when deglazing with wine, as they can scratch the Dutch oven’s surface and react with acidic liquids.
Fine-Mesh Strainer
For skimming fat and foam, a fine-mesh strainer (like the OXO Good Grips) makes the job effortless. I skim the surface 30 minutes before the ribs are done to ensure a cleaner, richer broth.
If you’re short on time, a large ladle works in a pinch—just be patient and remove the foam gently to avoid disturbing the broth’s clarity.
Chef’s Knife & Cutting Board
A sharp 8-inch chef’s knife and a stable cutting board (I love the John Boos Maple) are essential for prepping the aromatics. Chop the onions, carrots, and celery into even 1-inch pieces—this ensures they cook uniformly.
A mandoline speeds up the process, but hand-chopping gives you better control over the size and shape of each piece for even cooking. 💡
Nutrition facts
Frequently asked questions
Can I use bone-in or boneless short ribs for this recipe?
Bone-in short ribs are ideal—they add incredible depth to the broth and stay tender when cooked properly. If you must use boneless, look for 2-inch thick chuck roast cubes instead, but increase cooking time by 30-45 minutes since they lack the connective tissue that breaks down during slow cooking. The flavor will be slightly less rich, but still delicious.
How do I know when the short ribs are fully tender?
Use a fork to test the ribs—they should pull apart easily with minimal resistance. For precise results, insert a meat thermometer into the thickest part (avoiding bone) and cook until it reaches 195-203°F. The ribs will feel like butter when done, with no resistance when pierced. If they're still tough after 3 hours, add 1/2 cup hot water and cook another 30 minutes.
Can I make this soup in an Instant Pot or slow cooker?
Yes! For the Instant Pot, sear ribs first, then add all ingredients and cook on high pressure for 60 minutes, followed by a 10-minute natural release. For a slow cooker, follow the same steps but cook on low for 6-8 hours or high for 4-5 hours. The texture will be slightly different but still deeply flavorful. Just be sure to shred the meat thoroughly after cooking.
Why does my soup taste too salty?
This usually happens when using store-bought broth (which is often high in sodium). To fix it, add 1/2 cup hot water and 1 tbsp cornstarch mixed with 2 tbsp cold water, then simmer for 5 minutes to dilute the salt. For prevention, use low-sodium broth or homemade stock. Taste as you go—adjust seasoning gradually rather than adding all salt at once.
Can I make this soup ahead of time?
This soup tastes even better the next day as flavors meld. Store in an airtight container in the fridge for 3-4 days or freeze for up to 3 months. Reheat gently on the stove over medium-low heat, stirring occasionally, until warmed through. Avoid microwaving—it can make the broth watery. The meat will be even more tender after resting overnight.