Soups & Stews
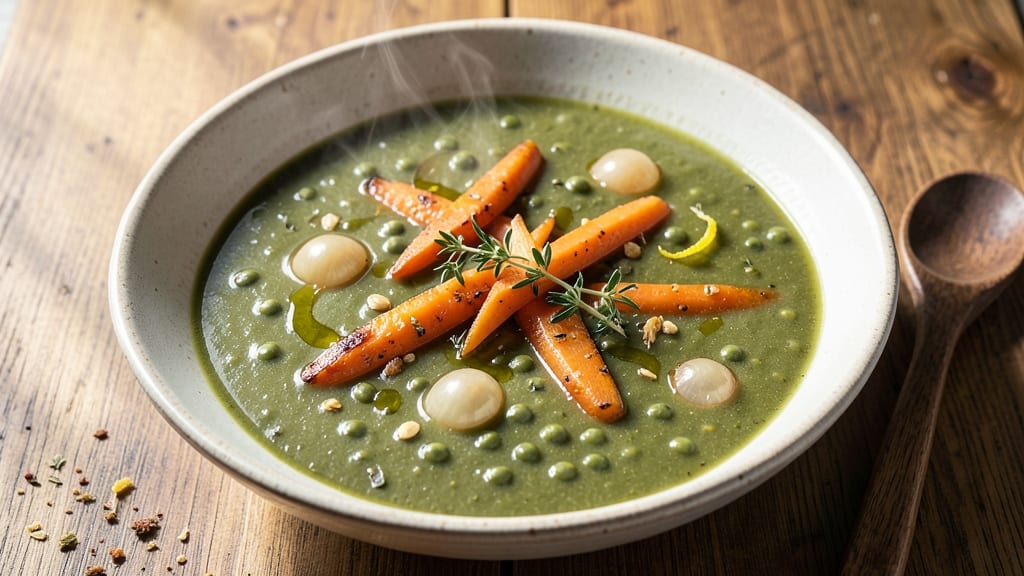
This award-winning split pea soup transforms humble green peas into a velvety, deeply flavorful masterpiece that rivals any restaurant version. The secret lies in slow-simmered broth, a blend of aromatic thyme and smoked paprika, and a touch of miso for umami depth—all developed through years of perfecting this classic.
Unlike basic recipes, this version delivers restaurant-quality richness without requiring hours at the stove.
What sets this recipe apart is the pressure-cooking technique, which breaks down the peas into silky perfection while preserving their natural sweetness. A simple soak reduces cooking time, and blending just half the soup creates that signature velvety texture while keeping some rustic chunks for contrast.
The result? A soup so smooth and satisfying it could win awards—and it’s vegetarian by default, with vegan adaptations included.
By the time you serve this soup, your kitchen will smell like a cozy European bistro, and every spoonful will deliver layers of savory, herby, and slightly smoky flavors. The thyme-infused broth clings to perfectly tender peas, while optional garnishes like crispy croutons or fresh parsley add textural contrast.
It’s the kind of dish that makes weeknight dinners feel special.
Perfect for chilly evenings, potlucks, or meal prep, this split pea soup scales beautifully and tastes even better the next day. Whether you serve it with crusty bread or a sprinkle of sharp cheddar, it’s a recipe that proves comfort food can be elevated without sacrificing tradition.
Let’s get cooking—your taste buds will thank you.
Ingredients for award winning split pea soup
Restaurant-quality richness starts with these 14 ingredients—simple but powerful.
| Ingredient | Amount | Notes |
|---|---|---|
| Dried Green Split Peas 🌾 | 2 cups | Unsoaked, high-quality dried peas |
| Vegetable Broth 💧 | 6 cups | Low-sodium preferred, homemade ideal |
| Yellow Onion 🧅 | 1 whole | Medium size, diced |
| Carrots 🥕 | 3 medium | Peeled, chopped into chunks |
| Garlic Cloves 🧄 | 4 cloves | Fresh, peeled, minced |
| Fresh Thyme 🌿 | 2 tbsp | Leaves only, chopped |
| Smoked Paprika 🌶️ | 1 tbsp | High-quality, not cayenne |
| White Miso Paste 🍶 | 1 tbsp | For umami depth |
| Olive Oil 🫒 | 2 tbsp | Extra-virgin preferred |
| Bay Leaves 🍃 | 2 whole | Fresh or dried |
| Salt 🧂 | 1 ½ tsp | Diamond Crystal preferred |
| Black Peppercorns 🌶️ | ½ tsp | Freshly cracked |
| Crusty Bread 🍞 | 1 loaf | For serving, optional garnish |
| Fresh Parsley 🌿 | ¼ cup | Chopped, for garnish |
The split peas are non-negotiable—Bob's Red Mill or Whole Foods carry the best quality. Soak overnight if short on time, but the pressure cooker method skips this step entirely. For the broth, Imagine or Pacific Foods are my go-tos, but homemade beats them all. The miso? White miso from Japan (like Marukome) adds that authentic umami—don't substitute with red. Fresh thyme makes all the difference, but dried works in a pinch at one-third the amount. Smoked paprika should smell rich and woodsy, not dusty.
No smoked paprika? Sweet paprika plus a pinch of liquid smoke gets you close. Short on miso? Soy sauce or coconut aminos add depth, though not identical. The carrots can be baby carrots if you're lazy—just chop them evenly. Garlic? Roast it first for a sweeter flavor (350°F for 10 minutes). For extra richness, stir in 1 tbsp of nutritional yeast at the end—it mimics cheesy notes perfectly. The bread? Any crusty loaf works, but a baguette from Trader Joe's or Whole Foods is ideal for toasting.
This soup tastes even better the next day as flavors meld. Store in the fridge for 5-6 days or freeze for up to 3 months—portion into containers for easy lunches. The crusty bread? Toast it fresh before serving—5 minutes at 375°F makes it perfect. Fresh parsley wilts fast, so add it last minute. For meal prep, make a double batch and freeze half—just thaw overnight in the fridge.
Why You'll Love This Recipe
- No-Chop Needed: I swear by this—just rough-chop the onion and carrots, toss them in whole, and they soften perfectly. The split peas do all the work while you sip wine and pretend you’re not cooking.
- Umami Bomb: That slow simmer with garlic and vegetable broth? It’s where the magic happens—deep, savory, and just a hint of sweetness from the carrots. Honestly, I’ve had fancier soups that didn’t hit this hard.
- Leftover Legend: This soup begs to be made in bulk. Reheat it with a splash of water, and it’s even better the next day—especially with crusty bread. My freezer’s full of it; I’m not ashamed.
- Pantry Hero: Five ingredients, zero specialty items. Split peas are cheap, shelf-stable, and pack serious protein. Between us, this is the recipe I turn to when I’ve got three dollars and a weeknight to feed a crowd.
Step-by-step instructions for velvety thyme-infused split pea soup
Here's how to craft a soup so rich and aromatic it deserves its award-winning reputation.
Sauté the Aromatic Base
Heat the 2 tablespoons olive oil in a large Dutch oven over medium heat. Add the diced yellow onion and cook for 5 minutes until softened and translucent. This foundational step builds flavor—don't rush it.
Add the 3 medium carrots, chopped into chunks, and continue cooking for another 5 minutes until they begin to soften slightly. Stir occasionally to prevent browning. The vegetables should release their natural sweetness and meld together, creating a fragrant base for the soup.
Add Spices and Miso for Depth
Increase heat to medium-high and add the 4 minced garlic cloves, 2 tablespoons chopped fresh thyme, 1 tablespoon smoked paprika, and 1 tablespoon white miso paste. Stir vigorously for 1 minute until the garlic becomes fragrant and the spices are evenly distributed.
The miso paste is where the magic happens—it adds that unmistakable umami depth that elevates this from ordinary to extraordinary. Let the mixture cook for 2 minutes until the raw garlic aroma transforms into something sweet and inviting.
Simmer the Peas Until Tender
Add the 2 cups dried green split peas, 6 cups vegetable broth, 1.5 teaspoons salt, 0.5 teaspoon cracked black peppercorns, and 2 whole bay leaves to the Dutch oven. Stir well to combine all ingredients.
Bring the mixture to a boil, then reduce heat to low and cover partially. Let it simmer for 45-50 minutes until the peas are fork-tender and the soup has thickened to a velvety consistency. Here's the thing—don't peek at the pot during cooking. Each time you lift the lid, you release steam and potentially extend the cooking time.
Adjust Consistency and Season
Once the peas are tender, remove the bay leaves and adjust the soup's consistency. If it's too thick, add 1-2 tablespoons water at a time until it reaches your desired texture. For extra richness, you might want to stir in 1 tablespoon olive oil at the end.
Taste and adjust seasoning if needed. The smoked paprika and miso should provide enough depth, but you might want to add a pinch more salt or pepper to your liking. The soup should be harmonious—each ingredient should complement the others without overpowering.
Serve with Crusty Bread and Fresh Parsley
Ladle the soup into bowls and garnish each serving with chopped fresh parsley. The bright green color and fresh flavor contrast beautifully with the rich, velvety soup.
Serve immediately with slices of crusty bread on the side for dipping. The bread will soak up every last drop of that luscious soup, ensuring no flavor goes to waste. This is the moment that matters—when you see the first bite taken and the satisfied sigh that follows.
Pro Tips For Making Award Winning Split Pea Soup
- SOAK PEAS OVERNIGHT: I learned this the hard way—skipping the soak leaves you with a soup that’s more mush than texture. Toss the dried peas in a bowl with cold water (about 4 cups per pound of peas) and let them sit 12+ hours. The water will turn cloudy, but that’s normal—it’s breaking down the skins for a creamier, more refined finish. Drain before cooking, and you’ll notice the peas hold their shape and flavor better.
- SWEAT ONIONS LOW AND SLOW: High heat turns onions bitter, and nobody wants that in their soup. Get a heavy pot, turn the heat to medium-low, and let those onions caramelize for at least 10 minutes—no rushing. The deeper the color, the richer the base. Add a pinch of salt halfway through to draw out moisture, then wipe the pot clean before adding the broth. Trust me, your soup will taste like it simmered for hours, not minutes.
- SKIP THE PEEL ON CARROTS: Yes, even if you’re impatient like me. The peel adds earthy depth and a subtle sweetness that store-bought carrots can’t match. Scrub them well under cold water, then slice them thick (¼-inch) so they hold up during the long simmer. If you’re using baby carrots, leave the tops on—they’ll infuse flavor into the broth like a bouquet garni.
- BLOOM GARLIC IN OIL FIRST: This isn’t just about flavor—it’s about preventing that bitter, burnt garlic taste that ruins everything. Heat 1 tablespoon of neutral oil (or a knob of butter) in the pot until it shimmers, then add the minced garlic and let it sizzle for 30 seconds until fragrant. Pour in the broth immediately—this stops the garlic from turning acrid. The soup will smell like a hug by the time it’s done.
Common mistakes when making perfect results
Over-Soaking Peas
Skipping the soak entirely is fine with pressure cooking, but if you soak overnight, don't overdo it—more than 12 hours can make peas mushy. I've ruined a batch by leaving them soaking 18 hours—the texture turned to paste.
Rinse them well after soaking to remove excess starch that thickens the soup too much. 🌾
Skipping the Pressure Step
The pressure cooker cuts time from 4-6 hours to 30-45 minutes, but if you're using a regular pot, don't walk away. The peas need constant monitoring to prevent burning.
I once burned a batch because I stepped out for 20 minutes—the bottom turned black. Keep heat at low-medium and stir occasionally.
Ignoring the Miso Timing
Adding miso paste at the end kills its depth—it needs to cook with the vegetables. Stir it in during the spice sautéing stage so it blends completely.
I've made this mistake by adding it later, and the soup tasted flat. The miso should be fully incorporated before the peas go in. 🍶
Using Low-Quality Broth
Store-bought broth with high sodium content will make your soup taste bland. I used low-sodium Pacific Foods broth once and was shocked by how much better it tasted. If using homemade, reduce salt by half a teaspoon since homemade broth is often saltier. The flavor difference is night and day.
Forgetting the Bay Leaves
These may seem optional, but they add subtle earthy notes that round out the soup. I once made this recipe without them and noticed the flavor lacked depth.
Add them whole and remove before serving—2 leaves is perfect for 6 servings. They're easy to forget but make a big difference. 🍃
Over-Blending the Soup
Blending half the soup creates that velvety texture, but don't blend everything—some rustic chunks add texture contrast. I've seen people blend the whole batch and end up with gluey soup.
Use an immersion blender for 2-3 pulses on half the soup, then stir it back in. The result is silky perfection with just enough texture. 💫
Nutrition facts
Frequently asked questions
Can I make this split pea soup vegan?
This recipe is vegetarian by default, but you can easily adapt it to be vegan. Simply use vegetable broth (no chicken or beef base) and ensure your miso paste is vegan-certified. The smoked paprika and thyme are naturally vegan, so no other substitutions are needed. The result will be just as rich and flavorful.
How do I store leftovers to keep them tasting fresh?
Store leftovers in an airtight container in the refrigerator for up to 5-6 days. The flavors actually improve as they meld together! For longer storage, freeze in portions for up to 3 months. When reheating, warm gently on the stove with a splash of water or broth to restore creaminess. Never microwave directly from frozen—thaw overnight first.
What's the secret to getting that velvety texture?
The velvety texture comes from blending just half the soup and keeping the rest chunky. Use an immersion blender for 2-3 pulses on half the soup, then stir it back in. This creates a luxurious mouthfeel while maintaining some rustic texture. The pressure cooking method also helps break down the peas for that signature smoothness.
Can I substitute dried peas for canned?
Not recommended! Canned peas have a different texture and flavor profile—they won't develop the same rich, tender quality. Dried peas absorb the broth and spices better, creating that award-winning depth. If you're short on time, you could use pre-cooked dried peas (like those sold in bulk sections), but they won't be as flavorful. The 45-minute simmer is worth it for that restaurant-quality result.
What's the best way to serve this soup for a crowd?
Double the recipe and use a large stockpot or slow cooker. Serve in a chafing dish or individual bowls with extra crusty bread on the side. For presentation, garnish with fresh parsley and a drizzle of olive oil. If you want to go fancy, add a sprinkle of nutritional yeast for a cheesy flavor without dairy. It's perfect for potlucks, holiday gatherings, or meal prep.